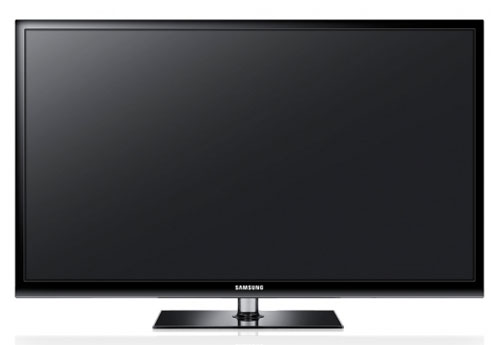
Two cheaper plasma offerings have arrived here at HDTVTest one after the other. Fresh from reviewing Panasonic’s TX-P42UT50, we got stuck into putting the Samsung PS51E490 through our gruelling tests. This is a 51-inch plasma TV which is priced online at just under £600. (It also seems to be incredibly similar to the cheaper PS51E450, although spec sheets indicate that this E490 variant features different colour reproduction characteristics).
<!-- google_ad_client = 'pub-2887677957235196'; google_ad_slot = '4990177225'; google_ad_width = 336; google_ad_height = 280; //-->
That’s a big-screen HDTV for a comparatively small amount of money, so what’s been left out to make the sums add up? Pixels. The PS51E490 is not a Full HD panel, but instead uses a resolution of 1024×768. That’s not a native 16:9 widescreen resolution: the 51E490’s 16:9 panel is achieved by using slightly rectangular pixels, rather than square ones.
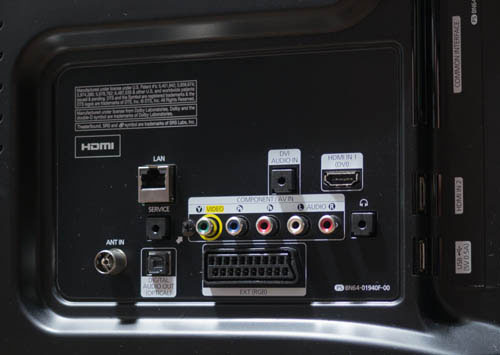
It does support 3D playback, features a DVB-T2 (“Freeview HD”) tuner, and although there are only 2 HDMI inputs, using plasma display technology, the Samsung PS51E490 has the potential to teach other budget displays (most of which are LCDs) a thing or two. So, is the PS51E490 a bargain, or is going near one false economy? Read on to find out.
Note: The specific model we reviewed was the PS51E490B1KXXU, the 3-pin-plug United Kingdom version. Although we did not test the smaller Samsung PS43E490, picture performance should be similar across the E490 series.

“Inoffensive” is the first word that comes to mind with the Samsung PS51E490: the flat-screen TV is styled in gloss black, the bezel is slim, and… that’s basically it. The design is completely plain, but also completely serviceable. We couldn’t ask for anything more at this price point. The plasma panel sits on top of a sturdy-looking, heavy, glass stand. The HDTV itself is somewhat slim, but not as much as Panasonic’s higher-end 2012 plasmas.
 |
| Rear connections on Samsung PS51E490 |
Despite being at the lower end of the price scale, the PS-51E490 does feature Samsung’s newest style on-screen menus (previous value-centric offerings had 2010-style on-screen graphics). That’s just an aesthetic difference of course, what really matters is what the menus let us do. There is no advanced 10-point greyscale nor three-axis colour management menu here, so let’s hope that Samsung’s own presets don’t leave us with radioactive grass and bleached faces! However, there is a 2-point greyscale calibration menu, a basic [Gamma] slider (useful for adapting video performance to differently lit environments) and a choice of two preset colour modes. We’ll find out if these can produce a good quality image later.
![[Picture] menu](https://www.hdtvtest.co.uk/news/wp-content/uploads/2018/04/hdtv_Samsung-PS51E490_menu.jpg) |
| [Picture] menu |
Note: Our Samsung PS51E490 review sample was calibrated using Calman Professional, the industry-leading video calibration software.
Basic setup on the Samsung E490 involved selecting the “Movie” picture mode, and then reducing the [Sharpness] control. The default mode was adding too much edginess to pictures, which, in tandem with the visible pixel edges (“screen door effect”) brought on by the lower-than-normal resolution panel, caused video content to appear harsh. In addition to this, with 1080p input from Blu-ray, the PS1E490 was cropping the edges of the picture, emulating the overscan of the CRT displays of old. Fortunately, this can be disabled by using the “Screen Fit” option in the Picture menu.
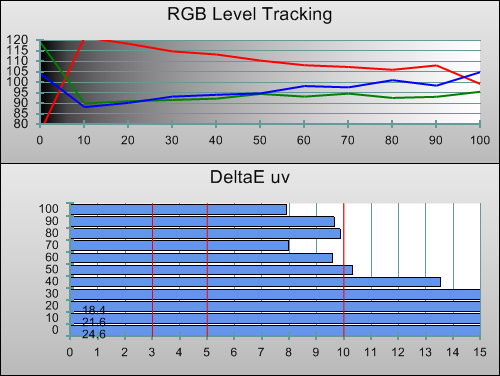
Out first impressions about the PS51E490’s images after just this basic setup: one, they had a red cast which will be visible to people used to watching calibrated screens (but probably not to most viewers), and two, they were BRIGHT. Measurements told us the extent of both observations – a 100% white window measured at 205 cd/m2, and as for the red tint:
 |
| Pre-calibration RGB tracking and delta errors (dEs) |
This is less accurate greyscale tracking than we’d like, seeing as the Samsung PS51E490 is a budget television, and users are unlikely to hire a calibrator to improve its performance further. If other PS51E490s out there also feature this red tint (remember, each individual panel is different), users can at least adjust the controls in the “White Balance” menu and “eyeball” improved settings, although obviously that’s by no means a scientific or accurate method.
![Post-calibration RGB Tracking in [Movie] mode](https://www.hdtvtest.co.uk/news/wp-content/uploads/2018/04/hdtv_Samsung-PS51E490_post-rgb.png) |
| Post-calibration RGB tracking and dEs in [Movie] mode |
Using the two-point Greyscale controls in the “White Balance” menu, we achieved the above result, which is a huge improvement on the default state. Some inaccuracies persisted, but these were typically below the threshold of visibility. Especially at 10-40% stimulus, we made sure to balance out the errors, rather than having a perfect 10-20% area and a visibly tinted 30-40% (or vice versa). All in all, the above result was enough to produce high quality, reasonably accurate video.
| Pre-calibration gamma tracking (2.2) | Post-calibration gamma tracking (2.4) |
We adjusted [Gamma] to the “-1” position, which, in tandem with our slight lowering of [Cell Light], meant that gamma tracked quite closely to 2.4, which is the same as that used in light-controlled image mastering suites. Leaving it at the default setting will produce appropriate results for the average room, which has some some light present.
The only controls that affect colour reproduction on the PS51E490 are the basic [Colour] and [Tint] controls, as well as a [Colour Space] selection, which is best left on “Auto” (“Native” is slightly less accurate).
However, there’s also a bug which results in its colour accuracy varying, although it doesn’t seem to be very common. We initially measured the results you see below, which indicate decent accuracy. At one point, though, we jumped back to the HDMI input which the test patterns were being fed to, remeasured, and got nearly perfect accuracy! Sadly, we were never able to reproduce this, but it tells us that the panel IS capable of this level of performance. (We made sure to measure, and save the results, as proof of this unusual occurrence.)
As it happens, the two basic controls are best left at defaults, too. While adjusting [Tint] appeared to give us better alignment of the secondary colours, it turned out that the changes did not affect all saturation levels – only the extreme outer edge of the gamut, which we found out when we measured saturation linearity with CalMan 5. In other words, we removed the (very) slight green tint from yellow at full saturation, but it remained skewed towards green in the less saturated shades. This would probably be more noticeable than a consistent, linear error, so we chose to leave [Tint] at the default position.
![Post-calibration CIE chart in [Movie] mode](https://www.hdtvtest.co.uk/news/wp-content/uploads/2018/04/hdtv_Samsung-PS51E490_post-cie.jpg) |
| Post-calibration CIE chart with reference to HD Rec.709 |
![Post-calibration Luminance levels in [Movie] mode](https://www.hdtvtest.co.uk/news/wp-content/uploads/2018/04/hdtv_Samsung-PS51E490_post-colour-lum.png) |
| Post-calibration colour luminance (coloured bars = targets; black bars = measured values) |
Luminance levels were the area in which there’s most room for improvement: red is too bright, green is too dark.
| Post-calibration colour saturation tracking |
Fortunately, provided we didn’t touch the [Tint] control, chromaticity was still linear: the colours may be slightly oversaturated, but they are at least tinted consistently.
| Jump To: 1. Design & CalibrationNext: Performance |
jQuery(document).ready(function($) { var toc = $("#tableofcontents").html(); $("#tablecontents").html(toc); });