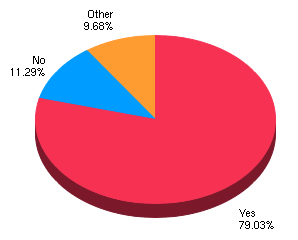
In our latest VIP poll, contributors to our HDTV fundraising campaigns were asked if they would be happy for the settings to be published for every reader. As you can see from the pie chart above, the majority said yes.
So here are the post-calibration settings for the Sony KDL40X3500 I reviewed in a dimly lit environment. While these values provided D65 images for my set, they might not do so for yours because of different input source, ambient lighting and of course possible variation between individual units. Nevertheless they should provide a good starting point for achieving picture quality that comes close to the standard used in film studios… I highly recommend at least using a calibration disc such as Digital Video Essentials HD DVD to finetune your black level (“Brightness”) according to your source.
 |  |
 |  |
 |  |
 |  |
 |  |
 |  |
 |  |
 |  |
 |  |
 |  |
 |  |
 |  |
 |  |
 |  |
 |  |
 |  |
 |  |
 |  |
 |  |
 |  |
 |  |
 |  |
 |  |
 |  |
 |  |
 |  |
 |  |
 |  |
 |  |
 |  |
 |  |
 |  |
 |  |
 |  |
 |  |
 |  |
 |  |
 |  |
 |  |
 |  |
 |  |
 |  |
 |  |
 |  |
 |  |
 |  |
 |  |
 |  |
 |  |
 |  |
I have provided 2 separate settings for HD sources with [Game/ Text Mode] set to either “On” or “Off“. I recommend using the “Game Mode On” settings only if you cannot tolerate the auto dimming that occurs with [Game/ Text Mode] “Off“, because you will lose some important video processing functions like MotionFlow 100Hz if you engage [Game/ Text Mode].
If you’re not used to D65 images, you may find the picture too yellow/ red at first glance. This is because most of us are used to the 9300k colour temperature on most computer monitors, and have been conditioned to think that these whites are the real “white” (when they in fact look brighter due to their cooler colour temp). All I can say is that D65 is the standard adopted by movie makers and broadcast studios, which means that you should calibrate your television to D65 if you wish to see the colours in a movie reproduced as the director intended. What I suggest is to persevere with the above settings for 3 days to 1 week to get used to D65, and then revert to the out-of-the-box settings, at which point hopefully you’ll realise how artificial the colours were before calibration.
Another complaint might be that the picture is too dark. The Sony KDL40X3500 calibration was performed in a dimly lit environment, just like how we would watch a movie. The combination of [Backlight] “2” and [Power Saving] “Low” allows me to achieve the lowest black luminance (and reduce clouding to unobtrusive levels) while maintaining peak brightness in accordance with SMPTE specifications. In a brighter environment (e.g. during daytime), feel free to bump backlight up to 5 to boost shadow detail and top-end luminance.
Different video signals/ material will require different [Motion Enhancer] and [Film Mode] permutations to get the best picture. Here’s a guide:
| Picture Settings | Video | PAL Film | 1080/60 | 1080p/24 |
| [Motion Enhancer] | Standard | Standard | Off | Off |
| [Film Mode] | Off | Auto 2 | Auto 1 | Off |
Examples of how the above video signals relate to common programmes:
For all movies, [DRC Mode] should be disabled as it interferes negatively with film deinterlacing.
If you find the above settings useful or simply want to thank us for the hard work we put into our in-depth reviews, feel free send a couple of quid our way, which will be used to fund more HDTV purchases:
| Support hdtvtest.co.uk | |
| Amount: | £ 1£ 2£ 3£ 5£ 10 |