You wouldn’t know it from stepping outside here, but Spring is nearly upon us, and accordingly, so is a stack of new HDTVs. We’ve spent a good amount of time now with the Samsung UE55F8000, which is the 55-inch model from the Korean TV manufacturer’s highest-end 1080p LED LCD range (Samsung Ultra HD LCD and HD OLED TVs are also due to land sooner rather than later). In the UK, the F8000 series is also available as the 40-inch UE40F8000 and the 46-inch UE46F8000, with larger 65″ and 75″ models possibly in the pipeline.
The 55″ F8000 features 4 HDMI inputs, a DVB-T2 Freeview HD tuner (naturally), a DVB-S2 satellite tuner (branded “Freesat HD” in the UK), and Samsung’s new Quad Core processor, the primary purpose of which we understand is to provide a wider and faster range of Smart TV services. We’d guess that the better processor could also have been employed to give greater precision to motion vector interpolation calculations being done to support the claimed “1000hz Clear Motion Rate”; we’ll talk more about that feature later on in the review.
Samsung’s Smart TV platform has received a slick redesign this year, which we first saw at CES 2013. At HDTVTest, we certainly appreciate connected devices, and the faster the better, though our number one priority is, as always, picture quality. So, let’s get stuck in and see if the pictures this £2500 HDTV puts out are as smart as its online functions.
Note: The specific model we reviewed was the Samsung UE55F8000STXXU which is the 3-pin-plug United Kingdom version.
Updated 21 June 2013: Software update 1102 seemed to have brought about a couple of picture quality improvements which we observed on the smaller, 46-inch UE46F8000 we tested. More details in the “Performance” section.
There was a period around 2005 when the first Sony BRAVIA televisions launched, and almost overnight, the rest of the industry followed the Japanese brand in moving away from silver and back into producing black HDTVs with distinctive styling.
Then Samsung happened. In the years afterward, Sony’s design crown was stolen by the Korean giant, which started producing sleeker and sleeker flat-screen TVs with more daring design concepts. The company is still at the top, and although bezels are getting slimmer and slimmer, with fewer places for TV makers to make a design statement, Samsung are still producing distinctive and sleek HDTVs. Not surprisingly, more emphasis than ever is being placed on the stand. Samsung ships the UE55F8000 with a distinctive curved, chrome stand, which it calls the “Arc Stand”. The TV itself is incredibly thin, as we’ve come to expect from the edge-lit LED LCD displays that the firm so aggressively pushed as the new standard. Only at one point near the bottom does the back of the UE55F8000 bulge out to make room for HDMI, USB and other connections (and perhaps some audio hardware?)
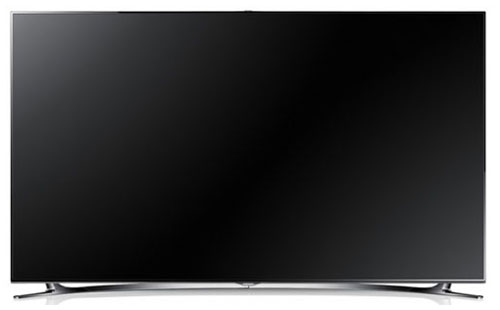
On the front, a tiny “SAMSUNG” logo appears at the bottom-centre of the panel, on a subtle chrome bulge. And at the top, a 5-megapixel camera can manually pop out when pushed (it’s a shame this isn’t motorised, given how slick the overall feel is).
The build quality is also an improvement on Samsung’s previous good standards. The 55F8000 feels remarkably solid and less plasticky than before. No parts of it bend or flex when squeezed, and gripping the edges of the unit doesn’t even make an impression on the LCD surface.
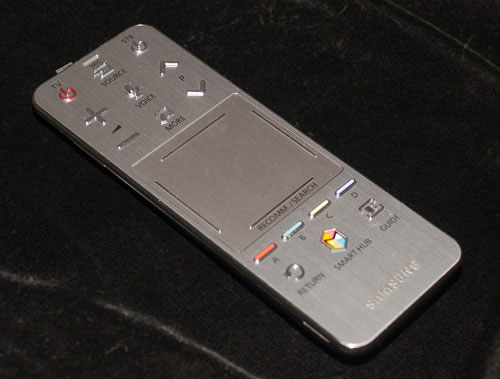
It’s an incredibly slick design, but even slicker is the streamlined “Smart” remote that accompanies the F8000. It’s finished in a brushed-steel like plastic effect and has shiny silver raised buttons, and a touchpad which can be used for navigating menus. The Smart Remote also has a microphone in it, to enhance the usability of the TV’s voice control features.
Samsung does also ship the UE55F8000 with a traditional remote, but it’s of the smaller, slightly lower-end variety that is supplied with its entry-level offerings. Why, it’s almost as if Samsung are planning to do away with the traditional clicker in favour of the new, snazzy version! As usable as the newer Smart remote can be, we still feel that a decent number of readers will use the traditional clicker, so we feel shipping the budget variant with a television this expensive may be an oversight.
Samsung has reinstated 4 HDMI inputs on the UE-55F8000 instead of the 3 they experimented with last year, which we’d call a smart move. There are also 3 USB ports, as well as Component and RGB SCART connections (by way of supplied adapters). The Luminance (green) jack on the Component connection can also double up as a Composite video input, if you are sadistic enough (or like retro video games). There are both terrestrial and satellite tuners on board. If you don’t want to use the built-in wireless access, there’s also an ethernet port for network connectivity.
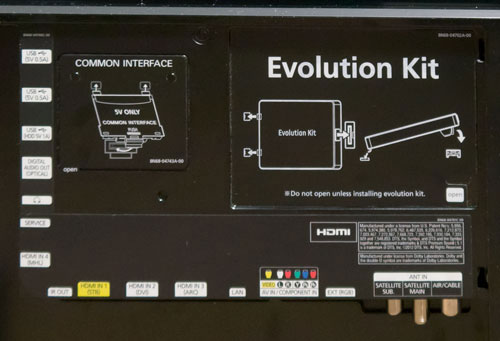 |
| Rear: 4 x HDMI, component, RGB SCART, aerial, Freesat, ethernet & audio outs |
The 2013 Samsung TVs have had some slight tweaks done to the menus. They’re basically the same as last year, but feel a little more responsive, and feature hard edges instead of rounded corners.
The biggest functional difference compared to last year is that by default, the Samsung UE55F8000 doesn’t feature per-input settings, which is honestly a welcome break: select and adjust the “Movie” mode on one input, and those picture settings will automatically be used for all other inputs on the TV. Per-input settings are still good to have – and the option is still here on the UE55F8000 – but now that we have all-digital sources that aren’t subject to variations in analogue output levels, most of what we’re adjusting is the panel itself rather than anything source-specific (unless we’re connecting a device that doesn’t play by the rules).
You might be wondering how this works if you DO in fact need to make small adjustments from device to device. Well, Samsung has you covered: simply change [Apply Picture Mode] from the default “All Sources” to “Current Source”, and you can then make further adjustments on a per-input basis. It’s a good implementation, but we recommend Samsung have a look at how Panasonic are achieving something similar – many of their HDTVs have a “Copy to…” feature in their picture menus, which leaves a bit less to the imagination as far as how settings are stored is concerned.
![[Picture] menu](https://www.hdtvtest.co.uk/news/wp-content/uploads/2018/04/hdtv_Samsung-UE55F8000_picture.jpg) |
| [Picture] menu |
As usual, the most accurate out-of-the-box picture preset is “Movie”. The other modes produce the hyper-bright, blue-tinted, motion-interpolated, and sometimes dynamic-range-crushed pictures that flat-panel televisions have sadly become known for (in their default settings, we hasten to add). By default, the Movie mode may appear quite dull, depending on your viewing environment, but light output from the panel is fully controllable with the [Backlight] setting. The other basic picture adjustments work as always.
![[Advanced Settings] submenu](https://www.hdtvtest.co.uk/news/wp-content/uploads/2018/04/hdtv_Samsung-UE55F8000_picture3.jpg) |
| [Advanced Settings] submenu |
Delving into the [Advanced Settings], we have a few calibration controls as well as a few others which take the image quality further away from the industry mastering standard (we’ll only comment on the former, since that’s where our interest lies). There’s a [Flesh Tone] adjustment which we never needed to touch – because we always attempt to hit the industry mastering standards for white point and colours and therefore see the same picture that was seen by the filmmakers and TV producers, the flesh tones should fall into place automatically and don’t need any extra correction. There are also Red, Green and Blue only modes, which can be used in conjunction with certain test patterns to check that the colour luminance levels are correct.
Moving on, Samsung’s [Colour Space] menu has a “Custom” mode, which gives full three-axis control over the red, green, blue, cyan, magenta and yellow colour gamut points. There are also two preset modes, and we’ll find out how good those are in the calibration section below. There are also two-point and ten-point controls over Greyscale tracking (which we can adjust using feedback from a calibration probe to make sure the overall colour tone of the screen is correct), and a basic [Gamma] control which will allow the brightness distribution from the screen to be adjusted to suit darker or brighter viewing environments.
![[Picture Options] submenu](https://www.hdtvtest.co.uk/news/wp-content/uploads/2018/04/hdtv_Samsung-UE55F8000_picture2.jpg) |
| [Picture Options] submenu |
There’s also a [Picture Options] menu which has control over an overall [Colour Tone] control (which affects the white point) – “Warm2” is the closest to being neutral – and also two noise reduction controls, the newly retitled [Digital Clean View] and the [MPEG Noise Filter].
European model Samsung HDTVs (that includes those on sale in the UK – Samsung doesn’t seem to have the peculiar tendency for separate model variants for this island that some other manufacturers have) had a feature where their Digital Noise Reduction system couldn’t be shut off, which could smear out fine details and the filmic texture from high quality sources, like Blu-ray Discs mastered from film (we also caught it smearing over certain effects in all-digital CG content). Although the system gave the appearance of having “Off” setting, this didn’t work, and the NR was constantly running (unless the “Game Mode” was enabled and calibrated, but this brought about other compromises).
We’re delighted to say that the undefeatable noise reduction is gone on the UE55F8000, and the user can set this control any way they wish. So, thank you Samsung, for listening to this request. Samsung’s NR processing actually was, and still is outstandingly good by in-TV standards, but the point here is that there are cases where high quality pictures are best left alone.
We also have the [Motion Plus] control, which contains deblur and dejudder features. It’s fantastic that these are individually controllable (some brands still ask that you take the two together; Samsung lets us pick and choose). We’ll discuss this in more detail later in the review, in the Motion Resolution section.
Lastly, there is the [Cinema Black] control, which attempts to dim the letterbox bars that appear at the top and bottom of ~2.35:1 (aka “21:9”) scope ratio movies. More on that later too.
Note: Our Samsung UE55F8000 review sample was calibrated using Calman Professional, the industry-leading video calibration software.
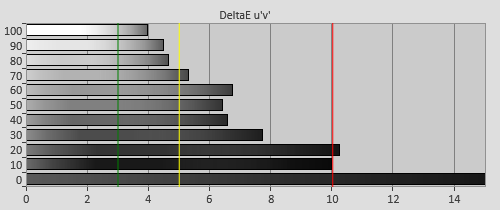
After unboxing, we selected the “Movie” mode, which is the picture preset which does the best job at showing video with its original colours and brightness levels. We still had to make a few adjustments, though: with a 1080p HD source, we lowered the [Sharpness] to 0 to avoid textures becoming harsh, and selected [Picture Size]: “Screen Fit” from the [Tools] submenu. This gave us an high-def image free of any haloing artefacts, without the edges of the picture being overscanned (cropped), and with uncompromised, full 1080p resolution. We then measured greyscale shades using our profiled Klein K-10 colorimeter device, which, together with CalMan software, reports how neutrally coloured the TV’s output is:
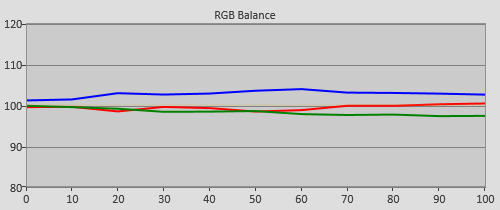  |
| Pre-calibration RGB tracking and delta errors (dEs) |
For an uncalibrated HDTV, the UE55F8000’s greyscale quality was good. Only a slight excess of blue permeated the image, and even in this case, we didn’t find the quality troubling. Of all the excesses you can have, blue is the easiest to ignore – and if you’re not used to watching calibrated displays all day every day like we are, you’d likely never notice anything was out of place. It’s also an improvement on last year’s ES8000 series (which we reviewed in May 2012), which featured a stronger blue glow in near-black areas of the picture, and also a red tint in the shadow details. By comparison, this year’s F8000 is a step better and although it features a bit of a blue tint, the said tint is remarkably consistent from the darkest up to the brightest shades that make up the TV picture, which bodes very well for later calibration perfection.
In fact, this positive attribute (called Greyscale Linearity) is more commonly seen on IPS LCD panels (such as those found in many LG and Panasonic LED TVs), which feature significantly poorer black depth than the VA type favoured by Samsung. So, hats off to Samsung for delivering the best of both worlds with the 55F8000’s panel.
  |
| Post-calibration RGB tracking and dEs in [Movie] mode |
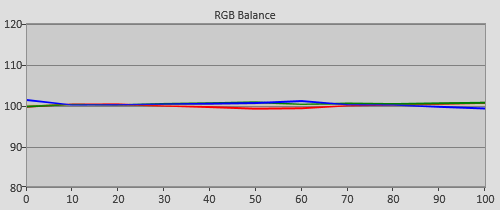
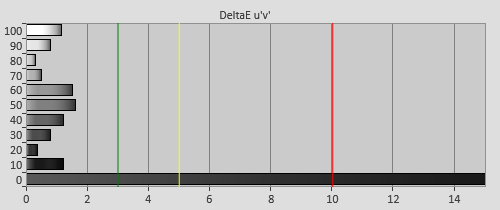
Calibration was an absolute cinch on the UE55F8000. Had we needed to, it does feature an extensive 10-point White Balance adjustment menu, which would allow us to fine-tune the colour of grey at each of the 10 measured areas seen in the chart above. In fact, we barely even touched this extensive control, and achieved the above result (which is visibly perfect and free of colour tints) almost exclusively with the standard 2-point control. Once again – the greyscale linearity on our Samsung 55-inch F8000 review unit was excellent.
You’ll notice that there is a small dip in red at around 40-70% brightness. Why didn’t we correct this if we had the full controls available to do so? Because the error is unnoticeable to the eye, and using in-TV calibration controls – especially, from our experience, 10-point adjustment settings – can create other subtle problems elsewhere. We chose to let sleeping dogs (invisible dogs?) lie.
![Pre-calibrated Gamma tracking in [Movie] mode](https://www.hdtvtest.co.uk/news/wp-content/uploads/2018/04/hdtv_Samsung-UE55F8000_pre-gamma.png) | ![Post-calibrated Gamma tracking in [Movie] mode](https://www.hdtvtest.co.uk/news/wp-content/uploads/2018/04/hdtv_Samsung-UE55F8000_post-gamma.png) |
| Pre-calibration gamma tracking (2.2) | Post-calibration gamma tracking (2.4) |
Default gamma in the “Movie” mode came in at roughly 2.2, and didn’t feature any non-linearity worth writing about – this, too, was remarkably consistent. Once again, this is an excellent result and means that images were free of unnatural lighting jumps, and appeared with a good amount of “richness”, without looking washed out or pale.
For movie viewing in a dark room, we targeted a gamma of around 2.4, which better suits how our irises adjust to darker surroundings. We achieved this by changing [Gamma] to -1 (we did also make some small adjustments to near-shadowed areas with the aforementioned 10-point white balance control, which can also be used as a gamma editor). As with Greyscale, we left some very small, unnoticeable inaccuracies rather than poking endlessly at them, to avoid tempting fate and creating other problems.
After we removed the slight blue tint from grey shades – and honestly, even before it – colour on the Samsung UE55F8000 didn’t leave us with any complaints, provided we stayed in the default “Auto” mode, which is the colour profile used by default in the Movie picture mode. We’ve omitted the pre-calibration charts from the page because they were so close to accurate anyway (here and here if you really want to see them).
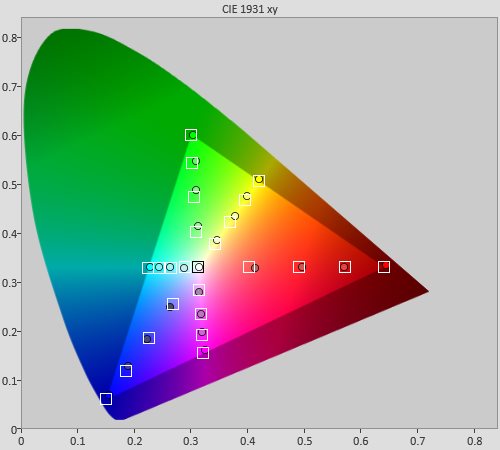
After some very minor touch-ups in the [Colour Space] menu, we were left with nearly perfect colour. Like a lot of LED LCD displays, the TV can’t fully saturate blue, but as always for smaller errors, the F8000’s tendency to colour deep blue with a little bit of extra purple is only noticeable if you have it side-by-side with a perfect comparison.
One thing to note is that Samsung’s colour management system (CMS) – that is, the “Custom” [Colour Space] mode – is excellent. We’ve reviewed other televisions where adjusting the advanced colour controls only corrects the most saturated extremes, and in fact makes the less saturated examples of the colour being adjusted worse (it degrades the saturation tracking). Well, not here. The gamut mapping is done in a way which appears to scale the adjustment in a linear way, meaning that after adjusting using the 55F8000’s “Custom” colour space menu, we were left with absolutely excellent chromaticity at all measured points…
 |
| Post-calibration colour saturation tracking |
…and perfect gamut luminance:
![Post-calibration Gamut Luminance levels in [Movie] mode](https://www.hdtvtest.co.uk/news/wp-content/uploads/2018/04/hdtv_Samsung-UE55F8000_post-glum.png) |
| Post-calibration gamut luminance (coloured bars = targets; black bars = measured values) |
Unsurprisingly given the darkening effect of active-shutter glasses, the 3D mode’s default configuration, even after switching to the Movie mode, is designed from the point of view of getting maximum light output from the panel, no matter what. The default [Contrast] setting of “100” results in discoloured whites starting somewhere inbetween 80% and 90% brightness, and our specific panel and glasses pair resulted in greeny-red tint, which is very common with 3-D TVs:
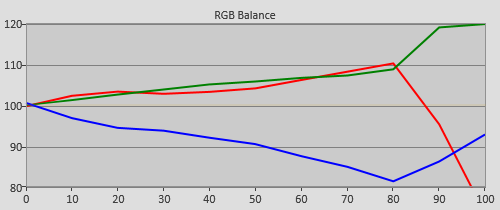 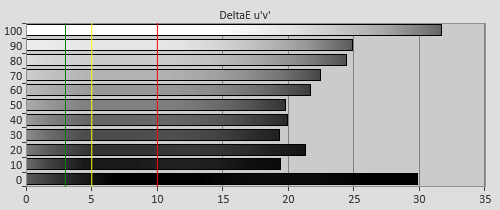 |
| 3D Pre-calibration RGB tracking and delta errors (dEs) |
Users shouldn’t be terrified by this inaccuracy. If you’re anything like us, the first thing you’ll notice in the third dimension on the UE55F8000 is how bright and deep the picture looks. What’s more, almost nobody will ever have seen a calibrated 3DTV because the practice isn’t widespread, owed partly to the difficulty and/or expense of the instruments required (it’s less accessible than 2D calibration). That doesn’t make it any less of an inaccuracy, though.
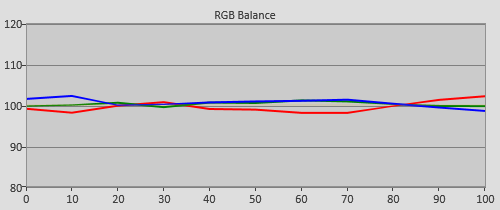 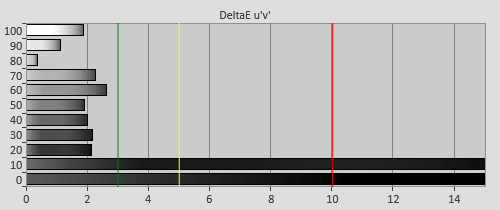 |
| 3D Post-calibration RGB tracking and dEs in [Movie] mode |
Before calibrating in 3D, we found which one of the [Colour Tone] preset modes yielded the closest-to-accurate colour of grey. On our specific review sample and glasses, this was “Warm1”. Had we adjusted “Warm2”, we would likely have run out of range on the [White Balance] controls. The 10-point White Balance control isn’t available in 3-D, but we managed to get an excellent result, with nearly all brightness levels below the visible error level with the basic 2-point mode. We did have to reduce [Contrast] by a fair amount (around 25 clicks) to avoid heavily discolouring the near-white shades… but even after this, the picture was still very bright; an excellent result.
The calibration we did above represents getting maximum greyscale accuracy out of the panel. During 3D calibration – that is, if there’s anyone out there doing it other than us and a few of our calibration colleagues in the USA – your calibrator should talk with you to decide which set of compromises is most acceptable to you. For example, we could have left more of the discoloured whites by not reducing the [Contrast] control, which would have allowed us to get better contrast performance from the LCD panel (since it would allow a brighter extra-dimensional picture at a lower [Backlight] setting, which, in turn, would improve low-end black depth at the expense of high-end colour stability).
The choices are up to you, or the calibrator – in any case, the Samsung UE55F8000 can put out bright, immersive tri-dimensional video, and you should definitely have it calibrated in 3D if it all possible. Again, at this price point, it would be a missed opportunity not to.
Samsung have provided an individual memory bank for the “Custom” colour space mode in 3D, so achieving near-perfection is no problem, after greyscale calibration. The only issue is that, like with many 3D TVs, the glasses mask the fully saturated red and blue colours, although these extremely saturated tones don’t appear much in content.
![3D Post-calibration CIE chart in [Movie] mode](https://www.hdtvtest.co.uk/news/wp-content/uploads/2018/04/hdtv_Samsung-UE55F8000_3d-post-cie.jpg) |
| 3D Post-calibration CIE chart with reference to HD Rec.709 |
![3D Post-calibration Luminance levels in [Movie] mode](https://www.hdtvtest.co.uk/news/wp-content/uploads/2018/04/hdtv_Samsung-UE55F8000_3d-post-glum.png) |
| 3D Post-calibration colour luminance (coloured bars = targets; black bars = measured values) |
| Dead pixels | None |
| Screen uniformity | Excellent for an edge-lit LED LCD, non-uniformity difficult to spot in real content |
| Overscanning on HDMI | 0% with [Picture Size] set to “Screen Fit” |
| Blacker than black | Passed |
| Calibrated black level (black screen) | 0.049 cd/m2 (if auto-dimming avoided, test invalid otherwise) |
| Calibrated black level (ANSI checkerboard) | 0.049 cd/m2 |
| Black level retention | Auto-dimming with full black screen, visibly stable otherwise (depending on setup) |
| Primary chromaticity | Excellent |
| Scaling | Excellent |
| Video mode deinterlacing | Excellent: Very effective jaggies reduction |
| Film mode deinterlacing | Excellent: Passed 2-2 PAL and 3-2 NTSC tests |
| Viewing angle | Very good for VA LCD: small loss of contrast and purplish tinge appears |
| Motion resolution | 1080 with [Motion Plus] enabled, 300 baseline |
| Digital noise reduction | Excellent (defeatable, and of excellent quality if required for poor quality analogue sources) |
| Sharpness | Defeatable edge enhancement |
| Luma/Chroma bandwidth (2D Blu-ray) | Full Luma, Chroma horizontally blurred except in Game Mode and PC mode |
| 1080p/24 capability | No judder in 2D, judder in 3D |
| Input lag | 44ms compared to lag-free CRT |
| Full 4:4:4 reproduction (PC) | Yes, with 60hz signal and “PC” input label |
| Default [Standard] mode (2D) | 107 watts |
| Default [Standard] mode (3D) | 147 watts |
| Calibrated [Movie] mode (2D) | 80 watts |
| Calibrated [Movie] mode (3D) | 147 watts |
| Standby | 1 watt |
| Jump To: 1. Design & CalibrationNext: Performance |
jQuery(document).ready(function($) { var toc = $("#tableofcontents").html(); $("#tablecontents").html(toc); });