When it comes to flat-screen TVs, Dutch electronics giant Philips has fallen off the radar, at least here in the UK. In fact, nearly a year ago, it was widely reported that the company had exited the TV business. That doesn’t mean that Philips TVs are a thing of the past though, just that the company has handed the reigns – and the rights to use their brand name – to a join-venture company called TP Vision. In fact, the “original” Philips actually owns a 30% stake in TPV.
Today we’re looking at the Philips 46PFL8007T, which is one rung below the company’s top-end 9000 series. Compared to that, the 46PFL8007 is missing the Moth Eye anti-reflective screen coating, LED local dimming (which Philips brands “Micro Dimming Premium”), and has a lower motion clarity rating. What it does have is built-in wireless networking, Philips’ Smart TV Premium platform, the firm’s “Perfect Pixel HD Engine”, and of course, the brand’s most prominent unique selling point, Ambilight.
With these behind-the-scenes changes afoot, what better a way to kick off 2013’s TV reviews with an in-depth review from a brand we’ve not seen much of in a while? Many readers have asked us over the years how Philips HDTVs perform, so, let’s find out how an LED LCD from this newly revitalised company satisfies the demands of AV enthusiasts.
Note: The specific model we tested was the Philips 46PFL8007T/12 which is equipped with a DVB-T2 Freeview HD tuner, and is part of the 8000 series.
With bezels getting smaller and smaller, there are fewer opportunities than ever for companies to visually differentiate their flat-panel televisions. Philips rises to the challenge admirably, with the 46PFL8007’s LCD panel being framed by a sleek “brushed steel” style border which is around 1cm in width. This has rounded edges, and there’s a “lip” below the the Philips logo at the bottom of the screen.
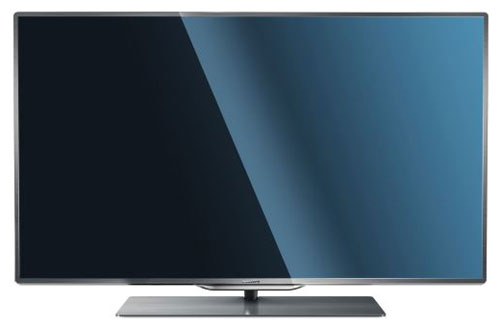
The stand is a neat piece of engineering too, and similarly to some Sony LED LCDs, it houses the speakers. Given our readers’ frequent complaints about the quality of most in-TV speakers, we’d call not placing them in the most obvious place a smart decision on Philips’ part. If you want to wall-mount the TV, you can actually secure the tabletop stand to the back of the unit, hiding it out of view while still allowing it to perform audio duties. A software selection during the setup stage applies equalization to take the different positioning into account. Or, you can leave it in the box if you’re planning on using an external AV receiver to drive your own speakers.
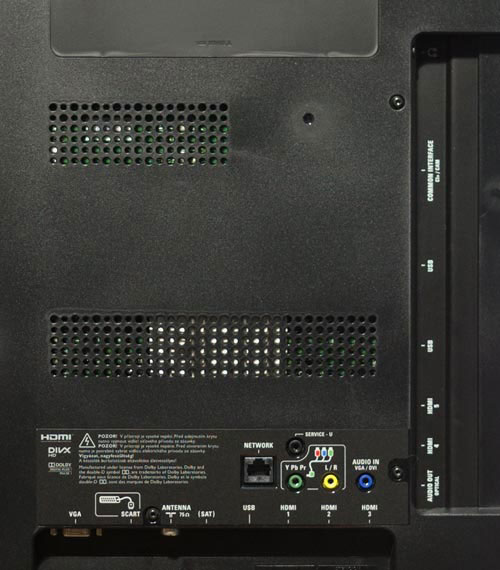 |
| Rear connections |
Philips flat-screen HDTVs have bucked the trend in terms of user interface for some time, and the 46PFL8007T/12 is no different. There are various setup wizards, including one which asks the user which picture and sound characteristics they prefer (decreased saturation versus boosted saturation, more or less bass and treble, and so on), and another which detects connected HDMI devices. The picture setup wizard doesn’t target accurate video, however, instead producing “shop-floor” style images.
The actual picture setup controls that AV enthusiasts will be keen to hear about are tucked away under a few layers of button presses. The menus are a little slow to react, however. The top-end AV adjustment is “Picture Style”, and there are now ISF Day and ISF Night modes selectable from this menu.
Older Philips TVs had the Backlight and traditional “Contrast” (white level) adjustments combined into one control, apparently to make the process as easy as possible for normal users. On the Philips 46PFL8007 the two are separated into [Backlight Contrast] and [Video Contrast] when the ISF modes are selected, which is a nice bit of extra control. Many of the controls in the menu are self-explanatory, with the brand’s own [Perfect Pixel HD] processing getting a submenu of its own.
![[Picture] menu](https://www.hdtvtest.co.uk/news/wp-content/uploads/2018/04/hdtv_Philips-46PFL8007_picture1.jpg) |
| Picture settings |
In here, we have a motion interpolation system, called [Perfect Natural Motion], with three processing levels and an “Off” switch. [Clear LCD] needs to be enabled to actually gain higher motion resolution from the interpolation performed using the previous option. We’ll analyse both of those controls in the Motion Resolution section. [Advanced Sharpness] accentuates the strength of the standard [Sharpness] control (it’s an On/Off toggle). Additionally, there is [Perfect Contrast] (contrast stretching at the video processing level) and [Dynamic Backlight] (which varies the intensity of the physical light sources in an attempt to increase contrast performance).
![[Picture] menu](https://www.hdtvtest.co.uk/news/wp-content/uploads/2018/04/hdtv_Philips-46PFL8007_picture2.jpg) |
| ISF calibration settings |
Of most interest to enthusiasts are the [ISF expert settings]. A [Light Sensor] adjusts the backlight (okay, edge-light) strength relative to the viewing environment. There’s a simple control over [Gamma] (which will help in adjusting the TV’s picture to different lighting conditions), a [Colour temperature] preset selection and two-point Greyscale calibration setting, the aforementioned traditional [Video contrast] control, a [Brightness] control which offers very fine adjustment, a two-axis colour management system called [Colour control], and an [RGB only mode] which can assist calibrators in setting colour decoding.
Note: Our Philips 46PFL8007T/12 review sample was calibrated using Calman Professional, the industry-leading video calibration software.
We chose the “ISF Day” mode initially after the 46PFL8007 handed control over to us. The ISF Day and ISF Night modes are intended for finetuning by calibrators, but as the most accurate preset modes, there’s no reason why everyday users interested in seeing an accurate picture shouldn’t also select them.
In the “ISF Day” mode, the picture lacks contrast and looks washed out by default. The reason for that is this mode’s gamma characteristics (gamma is the distribution of light output from the screen), which over-emphasises shadow details rather than producing a “richer” picture. We’ll explain this more in just a second. Fortunately, this is easily adjusted via the [Gamma] control in the [ISF expert settings] menu.
![Pre-calibrated Gamma tracking in [ISF Night] mode](https://www.hdtvtest.co.uk/news/wp-content/uploads/2018/04/hdtv_Philips-46PFL8007_pre-gamma.png) | ![Post-calibrated Gamma tracking in [ISF Night] mode](https://www.hdtvtest.co.uk/news/wp-content/uploads/2018/04/hdtv_Philips-46PFL8007_post-gamma.png) |
| Pre-calibration gamma tracking (avg 2.0) | Post-calibration gamma tracking (avg 2.3) |
Generally, we set up modes designed for viewing in darker environments in a way that causes the TV to display dark areas of the image with lower brightness (a higher gamma setting). The reason relates to how the human eye adapts to its surroundings: in a bright room a lower gamma setting (for example, 2.0 or 2.2) with more emphasised shadow details will compensate for the fact that our irises close down. Likewise, in a dark room our irises open up wider, so a television with a low gamma like 2.0 will appear greyish and washed out when viewed in these conditions. For that reason, we aim for an average gamma of 2.4 for these darker environments.
The average gamma of the Philips 46PFL8007 in the [ISF Night] mode was 2.06, which is low, especially for a night mode. Accordingly, one of the first things we recommend readers do is to find the [Gamma] option and raise it to +3 if they share our view that the picture appears low-contrast. In our tests, this brought us roughly into Gamma 2.3 territory (+4 came closer to 2.5, which might be a bit extreme). Unless you’re calibrating – in which case you or your hired calibrator will know exactly what the Gamma settings are doing and how to set them – then we encourage you to experiment with the setting to find what works for your environment.
After calibrating the 46PFL8007T this way, we were fairly happy with the image quality. There was still one thing that we became drawn to: dark areas of the picture appeared with unusual levels of noise. It might seem odd to mention noise when we’re discussing digital electronics – can a digital video processor in a digital TV receiving digital broadcasts create noise? Not in the traditional sense of the word, but without getting into a discussion on semantics, we should cut to the chase and mention that the Philips 8007 has a tendency to exaggerate nearly invisible noise which existed in the content already (be it noise from a camera, film scanner, or simply film grain). Dark scenes would often display with some compression artefacts which aren’t visible on other displays. So, the HDTV doesn’t create the noise, but it does make it more visible.
As far as we can ascertain from measurements and visual observation, the culprit is the 46PFL8007’s slightly unusual gamma tracking, which is off-target in the near-black areas. If you look at the “Post-calibration gamma tracking” chart above, which we measured at the highest precision allowed by our calibration software (21 measurement points), the orange line represents the ideal target, and the bars represent the level of brightness the TV screen was outputting when asked to display a specific shade of grey. When asked to show 5% grey, you’ll notice that the 46PFL8007T outputs a shade that’s very slightly too dark, whereas when asked to show 10%, it’s a little bit too bright, 15% more so, and so on. This “hump” in the gamma response is the likely reason, and it can be verified by visual observation of a gradient ramp pattern. A sudden change of light output across a very small part of the picture’s dynamic range can cause such issues.
Unfortunately, dark areas of the picture are the last place you want to have these issues. If we’re talking purely analogue (or extremely high quality studio-grade video), emphasising the shadowed areas is going to result in more visible noise. If we’re talking about compressed digital video – that’s more or less everything that’s available to ordinary consumers in 2013 – then it’s a bigger problem still, because one of the fundamentals of video compression is discarding details that the human eye can’t easily see (psychovisual optimisation). In a typical situation, fine details in dark areas are too difficult to distinguish, so they can be more coarsely compressed or sometimes often discarded entirely. By making these areas more visible than they should be, the Philips 46PFL8007 reveals compression artefacts and noise that normally wouldn’t be visible.
Put more simply: the Philips 46PFL8007T exaggerates a very selective range of brightness levels, and that can cause noisiness in near-black parts of the picture. We tried everything we could, but ultimately there is no way around this on the latest 46-inch version of the Philips 8000 series. Fortunately, it’s not a huge deal, but it’s there.
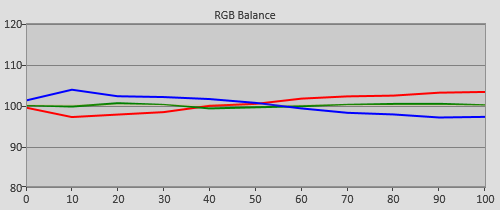 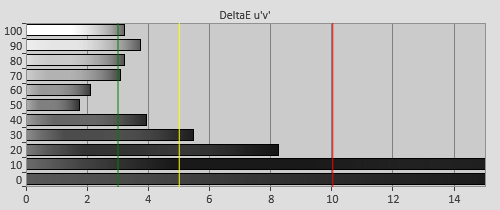 |
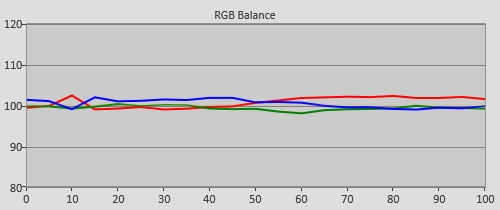
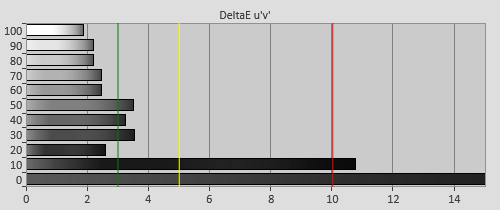
| Pre-calibration RGB tracking and delta errors (dEs) |
For a freshly unboxed, uncalibrated TV, the Philips 46PFL8007 put out a very naturally coloured picture in the [ISF Night] mode. A glance at the RGB Balance chart above reveals that the 8007 coloured darker shades with a bit of a blue tinge (which is much better than shadows that are tinted green or red), and less critically, gave brighter areas just a bit too much warmth.
The “DeltaE u’v'” chart below is another way of ranking the severity of the error. A DeltaE value of 3 (marked on the chart by a green line) or less is essentially invisible and not really worth worrying about. Anything higher than 10 (red line) is a more severe tint. So, the 46PFL8007T gave us good performance, especially for an HDTV which hasn’t been hand-tuned by a calibrator.
  |
| Post-calibration RGB tracking and dEs in [ISF Night] mode |
Philips offers a “Custom” colour temperature option for video enthusiasts who’ll be having their 46PFL8007s individually calibrated for optimal image reproduction. Although we did make an overall improvement to picture quality – most notably, banishing as much of the blue tint in the shadows as we could – we couldn’t achieve total perfection. It was often the case that the two sets of controls – one for adjusting dark areas, one for adjusting bright ones – interacted with each other. For example, had we removed the mild red tint in the highlights (right of the chart), we’d have coloured our shadows red, too, and that would be much worse. In the end, we were left with a slight red tinge at 10%, and a small but essentially unnoticeable tint in the highlights. Crucially, much of the critical shadow areas were no longer off-colour.
Pre-calibrated performance here was, again, excellent:
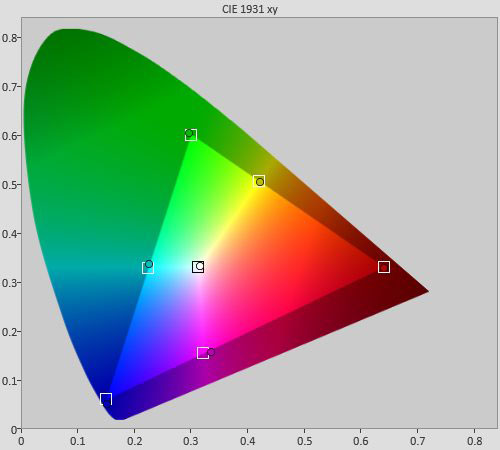 |
| Pre-calibrated Chromaticity |
![Pre-calibration Gamut Luminance levels in [ISF Night] mode](https://www.hdtvtest.co.uk/news/wp-content/uploads/2018/04/hdtv_Philips-46PFL8007_pre-glum.png) |
| Pre-calibrated gamut luminance (coloured bars = targets; black bars = measured values) |
Philips offers a two-axis colour management system on the 46PFL8007, with the adjustments being available for all six measured colours, and split into “Hue” and “Saturation”.
In truth, the “Saturation” control actually affects luminance – that is, the brightness of the colours. That’s one of the most critical parts of colour reproduction, so we’re happy to see it, given the absence of full three-axis control. A lack of that doesn’t hurt the 46PFL8007T one bit though, because even before any adjustments were made, the performance was excellent, anyway. We were able to make some minor tune-ups and arrive at the following outstanding result.
(By the way, there is a small bug in the Colour Management screen that calibrators should be aware of. Sometimes, selecting the “Saturation” menu will actually bring you into the “Hue” one, and vice versa. Before you start adjusting, be absolutely sure that you’re in the right place!)
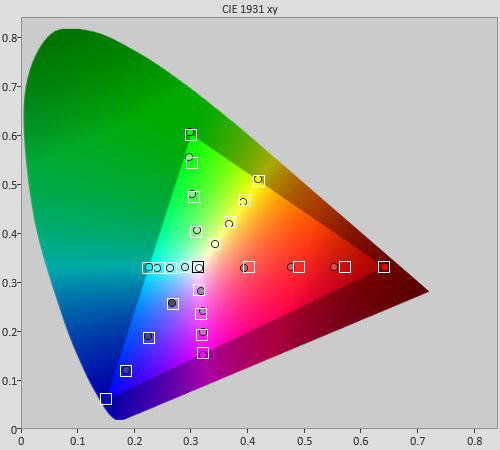 |
| Post-calibration colour saturation tracking |
![Post-calibration Gamut Luminance levels in [ISF Night] mode](https://www.hdtvtest.co.uk/news/wp-content/uploads/2018/04/hdtv_Philips-46PFL8007_post-glum.png) |
| Post-calibration gamut luminance (coloured bars = targets; black bars = measured values) |
The Philips 46PFL8007T/12 doesn’t have separate picture settings for the 2D and 3D output modes. As a result, we chose the one ISF-branded memory mode that we hadn’t already adjusted – ISF Day – and repurposed it as a separate location for our 3D calibrated picture settings.
Before we made any adjustments, though, here’s how it measured:
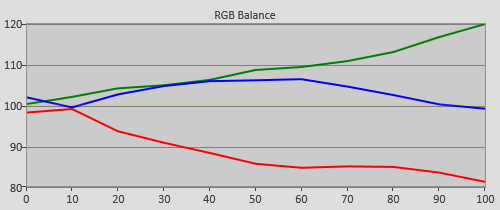 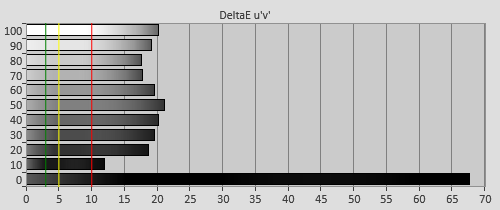 |
| 3D Pre-calibration RGB tracking and delta errors (dEs) |
Like many 3D TVs we’ve reviewed, it seems that the TV itself has no built-in countermeasure for the tint added by the active-shutter glasses. That may be because the tint varies from pair to pair. Whatever the reason, it means that extra-dimensional images appear with a greeny-blue tint that we’re sure 3D fans are no strangers to.
Depending on the calibration equipment used, it is possible to take readings of grey shades through the glasses, and reduce the tint as much as possible.
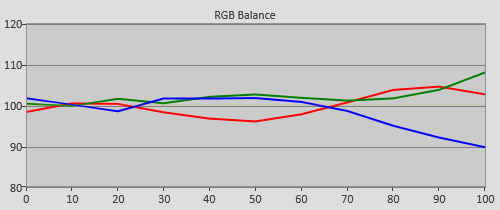 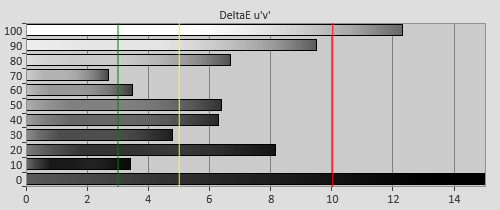 |
| 3D Post-calibration RGB tracking and dEs in [ISF Day] mode |
And reduce the tint we did. Moreso than in 2D, it wasn’t possible to totally remove visible tints in the grey shades. As usual, we focused on reducing keeping tints in the shadowed areas as low as possible, since these are the most critical areas. We nudged errors into the highlights, where they would be less visible. Although we could have improved the green/red tinted highlight areas by reducing the [Video Contrast], this would have involved an excessive loss of light output, and in 3D, we need all the luminance we can get.
Colour accuracy wasn’t a major problem in the third dimension. Pre-calibration, all of the colours were skewed towards green due to the tinted greyscale tracking. Afterwards, colour accuracy was similar to 2D.
![3D Post-calibration CIE chart in [ISF Day] mode](https://www.hdtvtest.co.uk/news/wp-content/uploads/2018/04/hdtv_Philips-46PFL8007_3d-post-cie.jpg) |
| 3D Post-calibration CIE chart with reference to HD Rec.709 |
![3D Post-calibration Luminance levels in [ISF Day] mode](https://www.hdtvtest.co.uk/news/wp-content/uploads/2018/04/hdtv_Philips-46PFL8007_3d-post-glum.png) |
| 3D Post-calibration colour luminance (coloured bars = targets; black bars = measured values) |
| Jump To: 1. Design & CalibrationNext: Performance |
jQuery(document).ready(function($) { var toc = $("#tableofcontents").html(); $("#tablecontents").html(toc); });