New Panasonic Plasma season continues with the delivery of the TX-P50GT60, which is one of a trio of new ranges to be powered by the Japanese manufacturer’s Hexa-Processing Engine. It sits above the recently reviewed ST60 series, but below the VT65/VT60 and the new flagship ZT65/ZT60 plasma, and is positioned, in Panasonic’s own words, as a “high-class all-rounder”.
In terms of specifications, that means that the Viera GT60 series features a newer panel, the same excellent “Infinite Black Pro” technology found on the ST60 (but not the “Ultra” or “Ultimate Black” versions found on the step-up VT and ZT series respectively), and the same “High Contrast Filter” from the ST60 (not “High Contrast Filter Pro” from the two higher-up plasma ranges). The motion rating is also higher, with the ST60 rated at “2500hz” and the GT60 and up featuring “3000hz” (although we haven’t found much difference in this regard before).
What’s more, the Panasonic GT60 range has a panel drive algorithm which is rated as being able to cleanly reproduce 30,720 24,576 gradation steps, compared to the 12,288 steps of the ST60. That should translate into near-black areas of the picture appearing cleaner, with more nuanced shades and less coloured noise being added by the PDP (plasma display panel) in these dark areas. However, on previous Panasonic plasmas, we found that using this behind-the-scenes feature lowered the contrast performance of the screen, with lighter blacks and greyer whites resulting – we’ll delve into the workings of this feature at length, naturally.
The GT60 series and above also add THX Display Certification, which guarantees a certain level of picture quality and accuracy. ISF calibration controls are also present for professional installers to get every last drop of quality out of the panel. There are also voice interaction controls, Panasonic’s new “My Home Screen” smart TV concept, and USB hard disk recording.
We were delighted overall with the Panasonic ST60, and found its picture quality hard to fault, but had to break the news that its input lag – while not devastatingly slow – was a step down from the snappy responsiveness of its predecessor, the ST50. The GT60 series and up run on Panasonic’s own processor which is being promoted under the “Hexa-core” name – rather than the Mediatek chip the ST60 used – so we’re hopeful that Panasonic’s engineers are able to squeeze a faster result for gamers out of this HDTV’s parts.
So, can the Viera TX-P50GT60 build on the outstanding picture quality of the Panasonic plasma range, and please all usage scenarios? Well, the rating is at the top of the screen, but read on anyway!
Note: The specific model we reviewed is the Panasonic TX-P50GT60B which denotes the 50-inch, British 3-pin-plug version. While we did not test the smaller, 42-inch Panasonic TX-P42GT60B, there shouldn’t be any major difference in picture performance given similar specifications within the GT60 range.
Update: Error in specified gradation steps corrected. Panasonic’s original specifications quoted 30,720 gradation steps, but now specifies 24,576. We have amended the above mention accordingly, but the rest of our review and impressions remain the same.
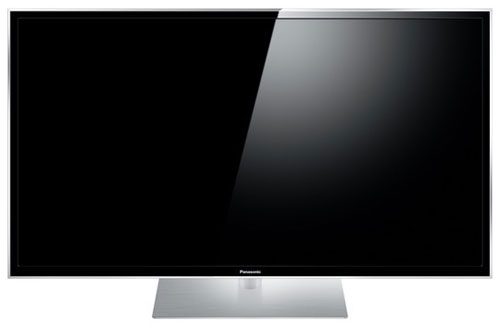
Last week, we reviewed the Panasonic ST60, and commented on its thin gloss black bezel, chrome outer ridge, and slim design. The TXP50GT60B is either exactly the same or almost exactly the same, with the differentiator being the truly slick slim, brushed steel stand, which may actually look a little bit out of place with the darker styling of the display itself. In any case, “understated” is probably the best word to use to describe the combination of screen and tabletop stand. It’s some way away from the bulkier, plainer Panasonic televisions of years past.
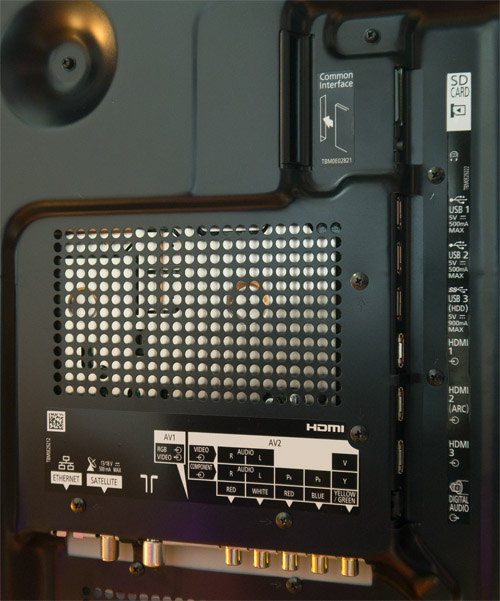 |
| Rear: 3x HDMI, 3x USB, Component/Composite pair, antenna, satellite, LAN & audio outs |
After unlocking [Professional Mode (isfccc)] in the [Setup] menu, the Panasonic 50in GT60 features eight [Viewing Mode] choices. The ones we’re most interested in are those that preserve the full accuracy of the video source. On last year’s GT50 and VT50 series, the different accurate modes had some further differences in how many shades of gradation they could produce, and also on the black level and brightness qualities of the screen.
![[Picture] menu](https://www.hdtvtest.co.uk/news/wp-content/uploads/2018/04/hdtv_Panasonic-TXP50GT60_picture1.jpg) |
| [Picture] menu |
We should just point out now that unlike last year, none of the modes have capped brightness or increased black level. The [Contrast] control can now be used in any mode to increase the light output of the screen (wish granted!), but there are still some minor picture differences, specifically with regard to gradation (how noisy near-black areas of the picture appear) and how very bright areas of the picture (“whiter than white” shades) are dealt with. Here’s what we have to work with on the Panasonic TXP50GT60:
As part of our in-depth testing, we calibrated both the Custom and Professional modes, and when it came to real-world content, we were unable to pick one over the other, although there were very minor differences in colour brightness levels which we could compensate for later. Test patterns however revealed that the [Professional] modes crush out more of the whiter-than-white shades which are present in some video signals, whereas the [Custom] mode retain a little bit of extra dynamic range. The whiter than white shades are quite rare in actual content and crushing them out really is no loss, but we have the option to retain them without any other compromises, so we used “Custom”. (By the way, if you’re really concerned about getting every single “whiter than white” shade in the Professional modes – we’re honestly not that bothered – there’s a way to do it with a service mode adjustment; ask us about if you want to know the specifics).
Beyond the basic setup controls, there are a number of other new options present:
![[Picture] menu](https://www.hdtvtest.co.uk/news/wp-content/uploads/2018/04/hdtv_Panasonic-TXP50GT60_picture2.jpg) |
| [Picture] menu |
Meanwhile, [24p Smooth Film] provides motion interpolation for 24p content (in Europe, that exclusively means films on Blu-ray). The “Off” and “Min” settings basically look identical, with no “soap opera effect” being applied. “Mid” retains the 96hz panel refresh rate but adds a bit of motion smoothing (not to our taste). “Max” applies aggressive motion smoothing, but changes the panel output rate to 60hz.
[Advanced Settings] features a [Panel Luminance Setting] which we asked for last year, but now find no reason to touch (irony?) because the basic [Contrast] control alone is enough to produce a very deep, bright picture. The [Panel Luminance Setting] works largely by adjusting the output gamma, rather than proportionally making the image brighter.
There is also a [Colour Gamut] control. “Rec.709” refers to the HDTV specification document, and is the right choice for HD content. “Native” shows the panel’s colours at full-blast without being reigned in to make them accurate. There are also options for “SMPTE-C” (American standard-definition content) and “EBU” (basically everywhere else’s standard-def content). Don’t worry about jumping back and forth between the different modes… the difference in picture is very small.
There are 10-point [White Balance] and [Gamma] calibration controls, and a full three-axis, six-colour [Colour Management] menu.
[Option Settings] houses the [Game Mode], which reduces input lag for video game usage, [Film Cadence Mode] for getting the most resolution out of films transferred to interlaced video, [1080p Pure Direct] which we’ll talk about later, and the [HDMI Content Type] screen (leave the settings in here Off for accuracy).
Finally, [16:9 Overscan] and the [Pixel Orbiter] are controlled in [Screen Settings]. Whew! Would you believe that a few years ago, Panasonic TVs didn’t have ENOUGH setup controls? Us neither!
Note: Our Panasonic TX-P50GT60B review sample was calibrated using Calman Professional, the industry-leading video calibration software.
Since we scoped out all of the available picture modes, we should make a recommendation now for users who want a best endeavour at accurate picture quality without paying for calibration (although we think you should reconsider, since an HDTV of this quality deserves it). The quickest and most painless way is to select the [Professional] mode; after which we still recommend turning off the various video processing features (we understand the marketing reason for including them, but the panel can carry the presentation on its own), making sure [16:9 Overscan] is disabled if your source is HD Blu-ray, and keeping the [Sharpness] down to 0, which is the neutral, nothing-added setting.
Afterwards, we threw up some grey test windows and measured the colour neutrality and light output levels to see how well the fresh, uncalibrated, Viera TX-P50GT60 was doing on its own:
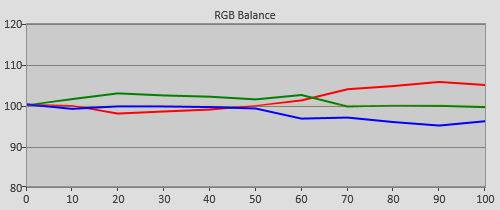 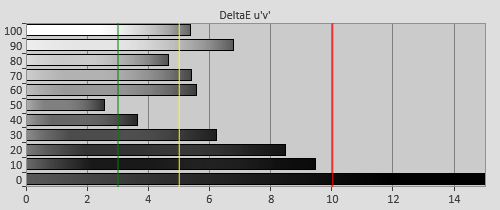 |
| Pre-calibration RGB tracking and delta errors (dEs) |
“Well”, was the answer. A slight green tint means that the 50GT60’s result here is not the best pre-calibrated result we’ve ever seen from Panasonic, but it’s at the level where you’d never know otherwise unless you’re in our position of owning measuring equipment, and having constantly-calibrated comparisons.
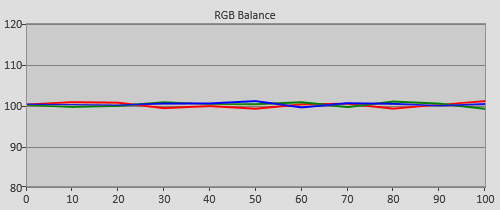 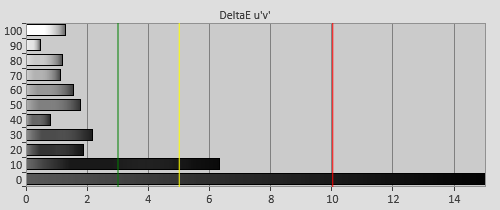 |
| Post-calibration RGB tracking and dEs in [Custom] mode |
The TXP50GT60 features both 2-point and 10-point White Balance controls. First, we used the 2-point control to get the most accurate result possible, before topping up small remaining tints with the more specific 10-point control. As usual, we only gently used the latter, for the simple reason that, on all plasma TVs we’ve tested, the greyscale tracking (the overall tint of the picture) can shift around a little bit in practice, depending on the brightness level of the scene being displayed (not enough to be apparent to the eye, but there if you want to measure it).
Relentlessly hammering away at the 10-point controls might result in extra subtle colour tints during very bright or very dark scenes, so a calibrator will take it easy. Remember, just because a small latent inaccuracy is measurable with test equipment doesn’t always mean that your brain can articulate it: take a look at the coloured vertical bars on the “Delta Error” chart above; any measurement lower than 3 (green bar) is essentially invisible in normal viewing.
The only small inaccuracy we were left with after calibrating this way was at 5% stimulus: just above black. These areas of the picture were now slightly red tinted. We should point out now that we are discussing the last drop of quality here – above-black tinting is very common on HDTVs; but given the picture quality the GT60 produces, we decided to try an alternative calibration strategy for the sake of exhausting all possibilities.
The Panasonic TXP50GT60B does not have an adjustment for the just-above-black greyscale mixing (the only devices we’ve seen that specifically have this are dedicated video processors with 4-figure prices), but we could still make an adjustment to this area with a round-about method. We instead used the low-end 2-point Greyscale controls ([Cutoff]) while measuring a 5% grey patch to get it appearing as neutral as possible. This caused the 10% and above areas – in other words, most of the picture – to appear greeny-blue, but since we do have individual control over those regions (with the 10-point white balance controls), we went through the tedious process of rebalancing each of these steps manually. Given that the GT60 features two [Professional] modes, it was easy for us to try both methods and then jump back and forth to see if there were any visible picture problems from using one over the other. There weren’t; our alternative idea worked and it improved the neutrality in dark scenes that little bit more. (In case any calibration die-hards are wondering, yes, the TX-P50GT60 interpolates greyscale mixing between the adjustable 10-point intervals, for the most part: there is a bit of “spread”, so our alternative strategy for totally neutral near-black areas didn’t result in 25, 35, 45%, etc., being wrong. We did sometimes have to compensate however, for example, knocking out the 80% and 90% adjustments in order to influence the 85% position).
![Pre-calibrated Gamma tracking in [Custom] mode](https://www.hdtvtest.co.uk/news/wp-content/uploads/2018/04/hdtv_Panasonic-TXP50GT60_pre-gamma.png) | ![Post-calibrated Gamma tracking in [Custom] mode](https://www.hdtvtest.co.uk/news/wp-content/uploads/2018/04/hdtv_Panasonic-TXP50GT60_post-gamma.png) |
| Pre-calibration gamma tracking (avg 2.3) | Post-calibration gamma tracking (2.4) |
Measured with standard window patterns, pre-calibrated gamma averaged at around 2.32. There was a mild inaccuracy at both ends, which had the effect of brightening shadows (which resulted in dark scenes appearing with a touch of added grey) and also compressing highlights, which had the effect of producing mildly jaundiced patches in the brighter areas of faces.
Unlike some other Panasonic televisions, we actually derived 2.4 gamma from the “2.2” position and some adjustments with the 10-point gamma control (the “2.4” setting came closer to 2.5). However, as we always point out, there’s some “drift” inherent to plasma, and after calibrating totally flat 2.4 gamma with the controls, we measured the alternative APL patterns and found that the display was producing 2.49 averaged (and also a slightly redder greyscale). However, there were no large spikes or dips either way in the gamma tracking, meaning that in terms of actual everyday viewing, the discrepancy was largely statistical.
Out-of-the-box colour in the accurate picture modes was very good (the picture below is of the “Custom” mode, incidentally). Oddly, the most accurate [Colour Gamut] mode (“Rec.709”) featured a slightly under-saturated red primary. We could only just notice this in content when we ran the uncalibrated GT60 side-by-side with another calibrated screen.
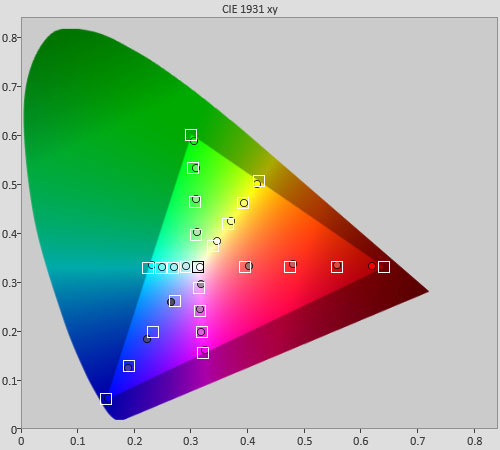 |
| Pre-calibration colour saturation tracking |
This is an excellent result for an uncalibrated TV, with the majority of colour errors appearing below the visible threshold of DeltaE 3 (green line):
![Pre-calibration colour errors in [Custom] mode](https://www.hdtvtest.co.uk/news/wp-content/uploads/2018/04/hdtv_Panasonic-TXP50GT60_pre-strack-de.png) |
| Pre-calibration colour errors (<3 not appreciable to the eye) |
We calibrated both the [Professional] and [Custom] modes on the TX-P50GT60, and found that when confirming the performance of both with saturation tracking tests, both measured essentially the same after adjustment. However, we found that jumping back and forth between the two revealed that [Custom] appeared that little bit more saturated than [Professional] (although we could later level the difference out with a slight downward adjustment of the global [Colour] control). The result leaves no room for complaint, all measured errors are below the threshold of being visible with content:
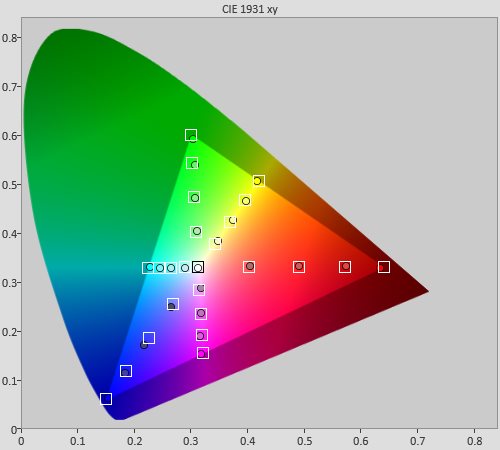 |
| Post-calibration colour saturation tracking |
![Post-calibration colour errors in [Custom] mode](https://www.hdtvtest.co.uk/news/wp-content/uploads/2018/04/hdtv_Panasonic-TXP50GT60_post-strack-de.png) |
| Post-calibration colour errors (<3 not appreciable to the eye) |
We attached a pair of the supplied active-shutter 3D glasses (the UK/Euro GT60 comes with two pairs in the box – as well as, not instead of, the plasma touch pen accessory) to our Klein K-10 meter, and scoped out the 3D display modes. There’s the “THX3D Cinema” mode, which, like its 2D counterpart, has coarser gradation (more panel dither noise) than the “Professional” and “Custom” modes. By default, it’s also brighter, but the other modes can have their light output increased with the [Contrast] control, as in 2D.
Therefore, we selected [Professional1] as the best 3D out-of-the-box mode, and measured its greyscale neutrality:
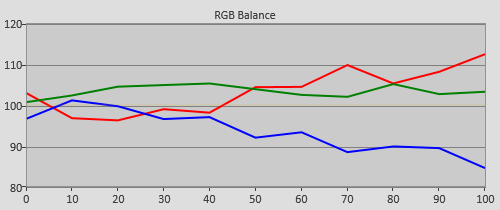 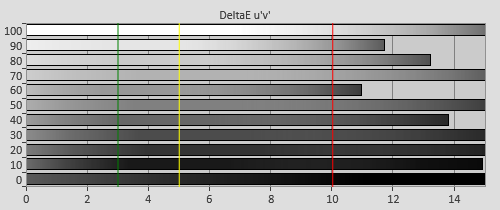 |
| 3D Pre-calibration RGB tracking and delta errors (dEs) |
The above result should show some of the unpredictably of tri-dimensional picture accuracy: not only does the plasma panel itself need some extra treatment to produce consistently neutral grey shades at the high refresh rate output needed for 3D, but the individual glasses also have their own tints (many of them block a lot of blue light, producing a warmish picture) – such was the case with the TX-P50GT60B.
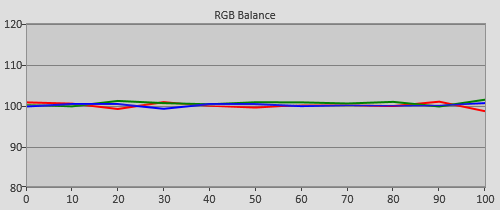 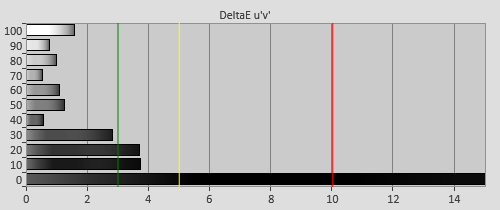 |
| 3D Post-calibration RGB tracking and dEs in [Custom] mode |
The White Balance controls are stored independently in 2D and 3D, as has been the case for all Panasonic 3DTVs since 2011. This allows for compromise-free 2-D and 3-D calibration should you be able to find a calibrator to do it. Just as in 2D, we manipulated the 2-point White Balance controls to get the flattest result possible, and then supplanted problematic areas with the 10-point mode. The result was a removal of the greeny-red tint.
Calibration in the third dimension is interesting: we find that the added depth and novelty of 3D allows it to get away with picture quality issues which would stand out like a sore thumb in 2D. However, calibrating the tint out is even more satisfying than 2D, thanks to the even bigger improvement. We admit it, we still sit here and flip the glasses on and off the tip of our noses while jumping back and forth between the 2D and 3D modes, admiring the fact that after calibration, the colour in each looks the same.
![3D Pre-calibration saturation tracking in [Professional1] mode](https://www.hdtvtest.co.uk/news/wp-content/uploads/2018/04/hdtv_Panasonic-TXP50GT60_3d-pre-strack.jpg) |
| 3D Pre-calibration saturation tracking |
![3D Pre-calibration colour errors in [Professional1] mode](https://www.hdtvtest.co.uk/news/wp-content/uploads/2018/04/hdtv_Panasonic-TXP50GT60_3d-pre-strack-de.png) |
| 3D Pre-calibration colour errors (<3 not appreciable to the eye) |
![3D Post-calibration saturation tracking in [Custom] mode](https://www.hdtvtest.co.uk/news/wp-content/uploads/2018/04/hdtv_Panasonic-TXP50GT60_3d-post-strack.jpg) |
| 3D Post-calibration saturation tracking |
![Post-calibration colour errors in [Professional1] mode](https://www.hdtvtest.co.uk/news/wp-content/uploads/2018/04/hdtv_Panasonic-TXP50GT60_3d-post-strack-de.png) |
| 3D Post-calibration colour errors (<3 not appreciable to the eye) |
| Dead pixels | None |
| Screen uniformity | Excellent |
| Overscanning on HDMI | Excellent – defeatable with 16:9 content |
| Blacker than black | Passed |
| Calibrated black level (black screen) | 0.005 cd/m2 |
| Calibrated black level (ANSI checkerboard) | 0.008 cd/m2 |
| Black level retention | Excellent – stable |
| Primary chromaticity | Excellent |
| Scaling | Excellent |
| Video mode deinterlacing | Excellent – Very effective jaggies reduction |
| Film mode deinterlacing | Excellent – Passed 2-2 PAL and 3-2 NTSC tests |
| Viewing angle | Excellent, but screen filter lessens vertical viewing angle |
| Motion resolution | Excellent (1080 lines) |
| Digital noise reduction | Excellent – optional |
| Sharpness | Very Good, full resolution, almost invisible undefeatable high frequency sharpening |
| Luma/Chroma bandwidth (2D Blu-ray) | Full Luma, chroma has slight vertically limitation (even in [1080p Pure Direct] mode) |
| Image retention | Very little |
| Posterization | Very small “hardened” edges during fast motion, moreso with very fast motion and high output rate (50hz content outputs at 100hz) |
| Phosphor trails | Very mild, can be reduced further with [Intelligent Frame Creation] on “Min” |
| 1080p/24 capability | Excellent – no judder in 2D or 3D |
| Input lag | 23ms compared to lag-free CRT |
| Full 4:4:4 reproduction (PC) | No, chroma vertically softened |
| Pre-calibration [THX Cinema] mode (2D) | 184 watts |
| Pre-calibration [THX3D Cinema] mode (3D) | 304 watts |
| Calibrated [Custom] mode (2D) | 179 watts |
| Calibrated [True Cinema] mode (3D) | 304 watts |
| Standby | 1 watt |
Measurements taken with full 50% grey screen.
| Jump To: 1. Design & CalibrationNext: Performance |
jQuery(document).ready(function($) { var toc = $("#tableofcontents").html(); $("#tablecontents").html(toc); });